Getting started with RAPIDS Accelerator on Databricks
This guide will run through how to set up the RAPIDS Accelerator for Apache Spark 3.0 on Databricks. At the end of this guide, the reader will be able to run a sample Apache Spark application that runs on NVIDIA GPUs on Databricks.
Prerequisites
* Apache Spark 3.0 running in DataBricks Runtime 7.3 ML with GPU
* AWS: 7.3 LTS ML (GPU, Scala 2.12, Spark 3.0.1)
* Azure: 7.3 LTS ML (GPU, Scala 2.12, Spark 3.0.1)
The number of GPUs per node dictates the number of Spark executors that can run in that node.
Start a Databricks Cluster
Create a Databricks cluster by going to Clusters, then clicking “+ Create Cluster”. Ensure the cluster meets the prerequisites above by configuring it as follows:
- Select the Databricks Runtime Version from one of the supported runtimes specified in the Prerequisites section.
- Under Autopilot Options, disable autoscaling.
- Choose the number of workers that matches the number of GPUs you want to use.
- Select a worker type. On AWS, use nodes with 1 GPU each such as
p3.2xlargeorg4dn.xlarge. p2 nodes do not meet the architecture requirements (Pascal or higher) for the Spark worker (although they can be used for the driver node). For Azure, choose GPU nodes such as Standard_NC6s_v3. - Select the driver type. Generally this can be set to be the same as the worker.
- Start the cluster.
Advanced Cluster Configuration
We will need to create an initialization script for the cluster that installs the RAPIDS jars to the cluster.
- To create the initialization script, import the initialization script notebook from the repo generate-init-script.ipynb to your workspace. See Managing Notebooks on how to import a notebook, then open the notebook.
- Once you are in the notebook, click the “Run All” button.
- Ensure that the newly created init.sh script is present in the output from cell 2 and that the contents of the script are correct.
- Go back and edit your cluster to configure it to use the init script. To do this, click the “Clusters” button on the left panel, then select your cluster.
-
Click the “Edit” button, then navigate down to the “Advanced Options” section. Select the “Init Scripts” tab in the advanced options section, and paste the initialization script:
dbfs:/databricks/init_scripts/init.sh, then click “Add”.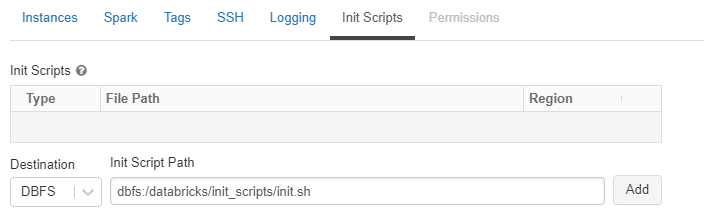
-
Now select the “Spark” tab, and paste the following config options into the Spark Config section. Change the config values based on the workers you choose. See Apache Spark configuration and RAPIDS Accelerator for Apache Spark descriptions for each config.
The
spark.task.resource.gpu.amountconfiguration is defaulted to 1 by Databricks. That means that only 1 task can run on an executor with 1 GPU, which is limiting, especially on the reads and writes from Parquet. Set this to 1/(number of cores per executor) which will allow multiple tasks to run in parallel just like the CPU side. Having the value smaller is fine as well.There is an incompatibility between the Databricks specific implementation of adaptive query execution (AQE) and the spark-rapids plugin. In order to mitigate this,
spark.sql.adaptive.enabledshould be set to false. In addition, the plugin does not work with the Databricksspark.databricks.delta.optimizeWriteoption.spark.plugins com.nvidia.spark.SQLPlugin spark.task.resource.gpu.amount 0.1 spark.rapids.memory.pinnedPool.size 2G spark.locality.wait 0s spark.databricks.delta.optimizeWrite.enabled false spark.sql.adaptive.enabled false spark.rapids.sql.concurrentGpuTasks 2
- Once you’ve added the Spark config, click “Confirm and Restart”.
- Once the cluster comes back up, it is now enabled for GPU-accelerated Spark with RAPIDS and cuDF.
Import the GPU Mortgage Example Notebook
Import the example notebook from the repo into your workspace, then open the notebook. Modify the first cell to point to your workspace, and download a larger dataset if needed. You can find the links to the datasets at docs.rapids.ai.
%sh

wget http://rapidsai-data.s3-website.us-east-2.amazonaws.com/notebook-mortgage-data/mortgage_2000.tgz -P /Users/<your user id>/

mkdir -p /dbfs/FileStore/tables/mortgage
mkdir -p /dbfs/FileStore/tables/mortgage_parquet_gpu/perf
mkdir /dbfs/FileStore/tables/mortgage_parquet_gpu/acq
mkdir /dbfs/FileStore/tables/mortgage_parquet_gpu/output

tar xfvz /Users/<your user id>/mortgage_2000.tgz --directory /dbfs/FileStore/tables/mortgage
In Cell 3, update the data paths if necessary. The example notebook merges the columns and prepares the data for XGBoost training. The temp and final output results are written back to the dbfs.
orig_perf_path='dbfs:///FileStore/tables/mortgage/perf/*'
orig_acq_path='dbfs:///FileStore/tables/mortgage/acq/*'
tmp_perf_path='dbfs:///FileStore/tables/mortgage_parquet_gpu/perf/'
tmp_acq_path='dbfs:///FileStore/tables/mortgage_parquet_gpu/acq/'
output_path='dbfs:///FileStore/tables/mortgage_parquet_gpu/output/'
Run the notebook by clicking “Run All”.
Hints
Spark logs in Databricks are removed upon cluster shutdown. It is possible to save logs in a cloud storage location using Databricks cluster log delivery. Enable this option before starting the cluster to capture the logs.