Getting Started with RAPIDS Accelerator with on premise cluster or local mode
Spark Deployment Methods
The way you decide to deploy Spark affects the steps you must take to install and setup Spark and the RAPIDS Accelerator for Apache Spark. The primary methods of deploy Spark are:
- Local mode - this is for dev/testing only, not for production
- Standalone Mode
- On a YARN cluster
- On a Kubernetes cluster
Apache Spark Setup for GPU
Each GPU node where you are running Spark needs to have the following installed. If you are running with Docker on Kubernetes then skip these as you will do this as part of the docker build.
- Install Java 8 - note jdk11 is supported by Spark, but we have been building and testing with jdk8, so we suggest using that for now.
- Ubuntu:
sudo apt install openjdk-8-jdk-headless
- Ubuntu:
- Install the GPU driver and CUDA toolkit. Instructions for Ubuntu 18.04 with CUDA 10.1 are below.
- Download and install GPU drivers and the CUDA Toolkit. Installing these packages will require a node reboot after installation.
wget https://developer.download.nvidia.com/compute/cuda/repos/ubuntu1804/x86_64/cuda-ubuntu1804.pinsudo mv cuda-ubuntu1804.pin /etc/apt/preferences.d/cuda-repository-pin-600wget http://developer.download.nvidia.com/compute/cuda/10.1/Prod/local_installers/cuda-repo-ubuntu1804-10-1-local-10.1.243-418.87.00_1.0-1_amd64.debsudo dpkg -i cuda-repo-ubuntu1804-10-1-local-10.1.243-418.87.00_1.0-1_amd64.debsudo apt-key add /var/cuda-repo-10-1-local-10.1.243-418.87.00/7fa2af80.pubsudo apt-get updatesudo apt-get -y install cuda
Below are sections on installing Spark and the RAPIDS Accelerator on a single node. You may want to read the deployment method sections before doing any installations.
Install Spark
To install Apache Spark please follow the official instructions. Supported versions of Spark are listed on the download page. Please note that only scala version 2.12 is currently supported by the accelerator.
Download the RAPIDS jars
The accelerator and cudf jars are available in the download section.
Download the RAPIDS Accelerator for Apache Spark plugin jar. Then download the version of the cudf jar that your version of the accelerator depends on. Each cudf jar is for a specific version of CUDA and will not run on other versions. The jars use a maven classifier to keep them separate.
- CUDA 10.1 => classifier cuda10-1
- CUDA 10.2 => classifier cuda10-2
- CUDA 11.0 => classifier cuda11
For example, here is a sample version of the jars and cudf with CUDA 10.1 support:
- cudf-0.17-cuda10-1.jar
- rapids-4-spark_2.12-0.3.0.jar
For simplicity export the location to these jars. This example assumes the sample jars above have been placed in the /opt/sparkRapidsPlugin directory:
export SPARK_RAPIDS_DIR=/opt/sparkRapidsPlugin
export SPARK_CUDF_JAR=${SPARK_RAPIDS_DIR}/cudf-0.17-cuda10-1.jar
export SPARK_RAPIDS_PLUGIN_JAR=${SPARK_RAPIDS_DIR}/rapids-4-spark_2.12-0.3.0.jar
Install the GPU Discovery Script
If you are using Apache Spark’s GPU scheduling feature please be sure to follow what your cluster administrator recommends. Often this will involve downloading a GPU discovery script and this example will assume as such. Download the getGpusResource.sh script and install it on all the nodes. Put it into a local folder. You may put it in the same directory as the plugin jars (/opt/sparkRapidsPlugin in the example).
Local Mode
This is for testing/dev setup only. It is not to be used in production. In this mode Spark runs everything in a single process on a single node.
- Install Spark
- Install the RAPIDS jars
- Launch your Spark shell session.
Default configs usually work fine in local mode. The required changes are setting the config spark.plugins to com.nvidia.spark.SQLPlugin and including the jars as a dependency. All of the other config settings and command line parameters are to try and better configure spark for GPU execution.
$SPARK_HOME/bin/spark-shell \
       --master local \
       --num-executors 1 \
       --conf spark.executor.cores=1 \
       --conf spark.rapids.sql.concurrentGpuTasks=1 \
       --driver-memory 10g \
       --conf spark.rapids.memory.pinnedPool.size=2G \
       --conf spark.locality.wait=0s \
       --conf spark.sql.files.maxPartitionBytes=512m \
       --conf spark.sql.shuffle.partitions=10 \
       --conf spark.plugins=com.nvidia.spark.SQLPlugin \
       --jars ${SPARK_CUDF_JAR},${SPARK_RAPIDS_PLUGIN_JAR}
You can run one of the examples below such as the Example Join Operation
Spark Standalone Cluster
For reference, the Spark documentation is here.
Spark Standalone mode requires starting the Spark master and worker(s). You can run it on a single machine or multiple machines for distributed setup.
The first step is to Install Spark, the RAPIDS Accelerator for Spark jars, and the GPU discovery script on all the nodes you want to use. After that choose one of the nodes to be your master node and start the master. Note that the master process does not need a GPU to function properly.
On the master node:
- Make sure
SPARK_HOMEis exported - run
$SPARK_HOME/sbin/start-master.sh- This script will print a message saying starting Master and have a path to a log file. Examine the log file to make sure there are no errors starting the Spark Master process.
export MASTER_HOST=[the hostname of the master]- Go to the Spark Master UI to verify it has started. The UI should be accessible at
http://${MASTER_HOST}:8080 - Find the Spark URL for the Spark Master. This can be found in the Spark Master logs or from the Spark Master UI. It will likely be:
spark://${MASTER_HOST}:7077. You will need this URL for starting the workers and submitting applications.
Now for each worker node:
- Setup worker configs on each node
cp $SPARK_HOME/conf/spark-env.sh.template $SPARK_HOME/conf/spark-env.sh- Edit
$SPARK_HOME/conf/spark-env.shand add any worker options. The example below sets the number of GPUs per worker to 4 and points to the discovery script. Change this for your setup.SPARK_WORKER_OPTS="-Dspark.worker.resource.gpu.amount=4 -Dspark.worker.resource.gpu.discoveryScript=/opt/sparkRapidsPlugin/getGpusResources.sh"
- Start the worker(s)
- For multiple workers:
- You can add each hostname to the file
$SPARK_HOME/conf/slavesand use the scripts provided by Spark to start all of them. This requires password-less ssh to be setup. If you do not have a password-less setup, you can set the environment variableSPARK_SSH_FOREGROUNDand serially provide a password for each worker. - Run
$SPARK_HOME/sbin/start-slaves.sh
- You can add each hostname to the file
- For multiple workers:
- For a single worker:
$SPARK_HOME/sbin/start-slave.sh spark://${MASTER_HOST}:7077
Now you can go to the master UI at http://${MASTER_HOST}:8080 and verify all the workers have started.
Submitting a Spark application to a standalone mode cluster requires a few configs to be set. These configs can be placed in the Spark default confs if you want all jobs to use the GPU. The plugin requires its jars to be in the executor classpath. GPU scheduling also requires the Spark job to ask for GPUs. The plugin cannot utilize more than one GPU per executor.
In this case we are asking for 1 GPU per executor (the plugin cannot utilize more than one), and 4 CPU tasks per executor (but only one task will be on the GPU at a time). This allows for overlapping I/O and computation.
$SPARK_HOME/bin/spark-shell \
       --master spark://${MASTER_HOST}:7077 \
       --conf spark.executor.extraClassPath=${SPARK_CUDF_JAR}:${SPARK_RAPIDS_PLUGIN_JAR} \
       --conf spark.driver.extraClassPath=${SPARK_CUDF_JAR}:${SPARK_RAPIDS_PLUGIN_JAR} \
       --conf spark.rapids.sql.concurrentGpuTasks=1 \
       --driver-memory 2G \
       --conf spark.executor.memory=4G \
       --conf spark.executor.cores=4 \
       --conf spark.task.cpus=1 \
       --conf spark.executor.resource.gpu.amount=1 \
       --conf spark.task.resource.gpu.amount=0.25 \
       --conf spark.rapids.memory.pinnedPool.size=2G \
       --conf spark.locality.wait=0s \
       --conf spark.sql.files.maxPartitionBytes=512m \
       --conf spark.sql.shuffle.partitions=10 \
       --conf spark.plugins=com.nvidia.spark.SQLPlugin
Running on YARN
YARN requires you to Install Spark, the RAPIDS Accelerator for Spark jars, and the GPU discovery script on a launcher node. YARN handles shipping them to the cluster nodes as needed. If you want to use the GPU scheduling feature in Spark it requires YARN version >= 2.10 or >= 3.1.1 and ideally you would use >= 3.1.3 in order to get support for nvidia-docker version 2.
It is recommended to run your YARN cluster with Docker, cgroup isolation and GPU scheduling enabled. This way your Spark containers run isolated and can only see the GPUs that were requested. If you do not run in an isolated environment then you need to ensure you run on hosts that have GPUs and there is a mechanism that allows you to allocate GPUs when the GPUs are in process-exclusive mode. See the nvidia-smi documentation for more details on setting up process-exclusive mode. If you have a pre-existing method for allocating GPUs and dealing with multiple applications you could write your own custom discovery class to deal with that.
This assumes you have YARN already installed and set up. Setting up a YARN cluster is not covered in these instructions. Spark must have been built specifically for the Hadoop/YARN version you use - either 3.x or 2.x.
YARN 3.1.3 with Isolation and GPU Scheduling Enabled
- Configure YARN to support GPU scheduling and isolation.
- Install Spark, the RAPIDS Accelerator for Spark jars, and the GPU discovery script on the node from which you are launching your Spark application.
- Use the following configuration settings when running Spark on YARN, changing the values as necessary:
$SPARK_HOME/bin/spark-shell \
     --master yarn \
     --conf spark.rapids.sql.concurrentGpuTasks=1 \
     --driver-memory 2G \
     --conf spark.executor.memory=4G \
     --conf spark.executor.cores=4 \
     --conf spark.executor.resource.gpu.amount=1 \
     --conf spark.task.cpus=1 \
     --conf spark.task.resource.gpu.amount=0.25 \
     --conf spark.rapids.memory.pinnedPool.size=2G \
     --conf spark.locality.wait=0s \
     --conf spark.sql.files.maxPartitionBytes=512m \
     --conf spark.sql.shuffle.partitions=10 \
     --conf spark.plugins=com.nvidia.spark.SQLPlugin \
     --conf spark.executor.resource.gpu.discoveryScript=./getGpusResources.sh \
     --files ${SPARK_RAPIDS_DIR}/getGpusResources.sh \
     --jars  ${SPARK_CUDF_JAR},${SPARK_RAPIDS_PLUGIN_JAR}
YARN 2.10 with Isolation and GPU Scheduling Enabled
- Configure YARN to support GPU scheduling and isolation
- Install Spark, the RAPIDS Accelerator for Spark jars, and the GPU discovery script on the node from which you are launching your Spark application.
- Use the following configs when running Spark on YARN, changing the values as necessary:
$SPARK_HOME/bin/spark-shell \
     --master yarn \
     --conf spark.rapids.sql.concurrentGpuTasks=1 \
     --driver-memory 2G \
     --conf spark.executor.memory=4G \
     --conf spark.executor.cores=4 \
     --conf spark.task.cpus=1 \
     --conf spark.task.resource.gpu.amount=0.25 \
     --conf spark.rapids.memory.pinnedPool.size=2G \
     --conf spark.locality.wait=0s \
     --conf spark.sql.files.maxPartitionBytes=512m \
     --conf spark.sql.shuffle.partitions=10 \
     --conf spark.plugins=com.nvidia.spark.SQLPlugin \
     --conf spark.executor.resource.gpu.discoveryScript=./getGpusResources.sh \
     --files ${SPARK_RAPIDS_DIR}/getGpusResources.sh \
     --jars  ${SPARK_CUDF_JAR},${SPARK_RAPIDS_PLUGIN_JAR}
YARN without Isolation
If you run YARN without isolation then you can run the RAPIDS Accelerator for Spark as long as you run your Spark application on nodes with GPUs and the GPUs are configured in EXCLUSIVE_PROCESS mode. Without this, there would need to be a mechanism to ensure that only one executor is accessing a GPU at once. Note it does not matter if GPU scheduling support is enabled.
- On all your YARN nodes, ensure the GPUs are in
EXCLUSIVE_PROCESSmode:- Run
nvidia-smito see how many GPUs and get the indexes of the GPUs - Foreach GPU index set it to
EXCLUSIVE_PROCESSmode:nvidia-smi -c EXCLUSIVE_PROCESS -i $index
- Run
- Install Spark, the RAPIDS Accelerator for Spark jars, and the GPU discovery script on the node from which you are launching your Spark application.
- Use the following configs when running Spark on YARN. Note that we are configuring a resource discovery plugin. Spark will first try to discover the GPUs using this plugin and then fall back to the discovery script if this doesn’t work. This plugin knows how to atomically acquire a GPU in process exclusive mode and expose it to the tasks.
$SPARK_HOME/bin/spark-shell \
       --master yarn \
       --conf spark.rapids.sql.concurrentGpuTasks=1 \
       --driver-memory 2G \
       --conf spark.executor.memory=4G \
       --conf spark.executor.cores=4 \
       --conf spark.task.cpus=1 \
       --conf spark.task.resource.gpu.amount=0.25 \
       --conf spark.rapids.memory.pinnedPool.size=2G \
       --conf spark.locality.wait=0s \
       --conf spark.sql.files.maxPartitionBytes=512m \
       --conf spark.sql.shuffle.partitions=10 \
       --conf spark.plugins=com.nvidia.spark.SQLPlugin \
       --conf spark.resources.discoveryPlugin=com.nvidia.spark.ExclusiveModeGpuDiscoveryPlugin \
       --conf spark.executor.resource.gpu.discoveryScript=./getGpusResources.sh \
       --files ${SPARK_RAPIDS_DIR}/getGpusResources.sh \
       --jars  ${SPARK_CUDF_JAR},${SPARK_RAPIDS_PLUGIN_JAR}
Running on Kubernetes
Kubernetes requires a Docker image to run Spark. Generally everything needed is in the Docker image - Spark, the RAPIDS Accelerator for Spark jars, and the discovery script. See this Dockerfile.cuda example.
Alternatively the jars and discovery script would need to be on a drive that is mounted when your Spark application runs. Here we will assume you have created a Docker image that contains the RAPIDS jars, cudf jars and discovery script.
This assumes you have Kubernetes already installed and setup. These instructions do not cover how to setup a Kubernetes cluster.
- Install Spark, the RAPIDS Accelerator for Spark jars, and the GPU discovery script on the node from which you are going to build your Docker image. Note that you can download these into a local directory and untar the Spark
.tar.gzrather than installing into a location on the machine. - Include the RAPIDS Accelerator for Spark jars in the Spark /jars directory
- Download the sample Dockerfile.cuda or create your own.
- Update the Dockerfile with the filenames for Spark and the RAPIDS Accelerator for Spark jars that you downloaded. Include anything else application-specific that you need.
- Create your Docker image.
docker build . -f Dockerfile.cuda -t ubuntu18cuda10-1-sparkrapidsplugin- Deploy your Dockerfile to the necessary repository to run on your K8S cluster.
- Use the following configs when you run. Change the executor and task amounts as necessary:
$SPARK_HOME/bin/spark-shell \
     --master k8s://https://<k8s-apiserver-host>:<k8s-apiserver-port> \
     --conf spark.rapids.sql.concurrentGpuTasks=1 \
     --driver-memory 2G \
     --conf spark.executor.memory=4G \
     --conf spark.executor.cores=4 \
     --conf spark.task.cpus=1 \
     --conf spark.task.resource.gpu.amount=0.25 \
     --conf spark.rapids.memory.pinnedPool.size=2G \
     --conf spark.locality.wait=0s \
     --conf spark.sql.files.maxPartitionBytes=512m \
     --conf spark.sql.shuffle.partitions=10 \
     --conf spark.plugins=com.nvidia.spark.SQLPlugin \
     --conf spark.executor.resource.gpu.discoveryScript=/opt/sparkRapidsPlugin/getGpusResources.sh \
     --conf spark.executor.resource.gpu.vendor=nvidia.com \
     --conf spark.kubernetes.container.image=$IMAGE_NAME
RAPIDS Accelerator Configuration and Tuning
Most of what you need you can get from tuning guide.
The following configs will help you to get started but must be configured based on your cluster and application.
- If you are using the KryoSerializer with Spark, e.g.:
--conf spark.serializer=org.apache.spark.serializer.KryoSerializer, you will have to register the GpuKryoRegistrator class, e.g.:--conf spark.kryo.registrator=com.nvidia.spark.rapids.GpuKryoRegistrator. - Configure the amount of executor memory like you would for a normal Spark application. If most of the job will run on the GPU then often you can run with less executor heap memory than would be needed for the corresponding Spark job on the CPU.
Example Command Running on YARN
$SPARK_HOME/bin/spark-shell --master yarn \
  --num-executors 1 \
  --conf spark.plugins=com.nvidia.spark.SQLPlugin \
  --conf spark.executor.cores=6 \
  --conf spark.rapids.sql.concurrentGpuTasks=2 \
  --executor-memory 20g \
  --conf spark.executor.memoryOverhead=10g \
  --conf spark.rapids.memory.pinnedPool.size=8G \
  --conf spark.locality.wait=0s \
  --conf spark.sql.files.maxPartitionBytes=512m \
  --conf spark.executor.resource.gpu.discoveryScript=./getGpusResources.sh \
  --conf spark.task.resource.gpu.amount=0.166 \
  --conf spark.executor.resource.gpu.amount=1 \
  --files $SPARK_RAPIDS_DIR/getGpusResources.sh
  --jars  ${SPARK_CUDF_JAR},${SPARK_RAPIDS_PLUGIN_JAR}
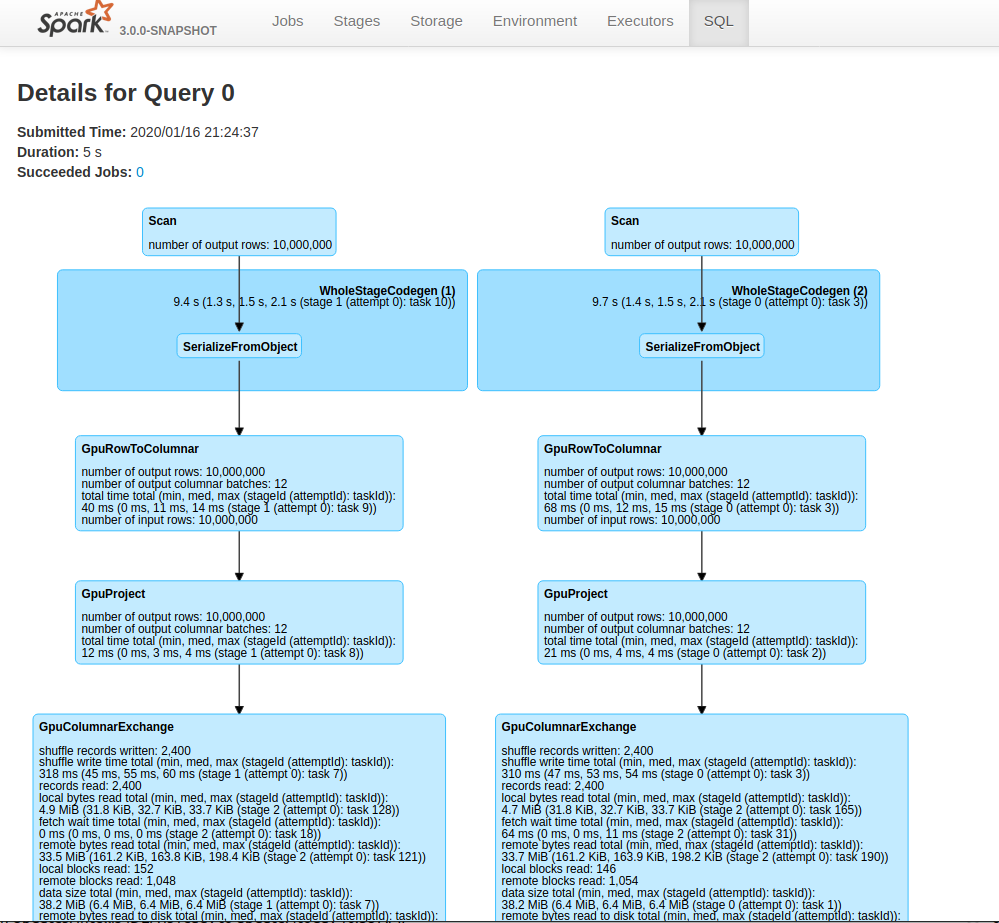
Example Join Operation
Once you have started your Spark shell you can run the following commands to do a basic join and look at the UI to see that it runs on the GPU.
val df = sc.makeRDD(1 to 10000000, 6).toDF
val df2 = sc.makeRDD(1 to 10000000, 6).toDF
df.select( $"value" as "a").join(df2.select($"value" as "b"), $"a" === $"b").count
Go to the Spark UI and click on the application you ran and on the “SQL” tab. If you click the operation “count at …”, you should see the graph of Spark Execs and some of those should have the label Gpu… For instance, in the screenshot below you will see GpuRowToColumn, GpuFilter, and GpuColumnarExchange. Those correspond to operations that run on the GPU.
Enabling RapidsShuffleManager
NOTE
The RapidsShuffleManager is a beta feature!
The RapidsShuffleManager is an implementation of the ShuffleManager interface in Apache Spark that allows custom mechanisms to exchange shuffle data. The RapidsShuffleManager has two components: a spillable cache, and a transport that can utilize Remote Direct Memory Access (RDMA) and high-bandwidth transfers within a node that has multiple GPUs. This is possible because the plugin utilizes Unified Communication X (UCX) as its transport.
- Spillable cache: This store keeps GPU data close by where it was produced in device memory, but can spill in the following cases:
- GPU out of memory: If an allocation in the GPU failed to acquire memory, spill will get triggered moving GPU buffers to host to allow for the original allocation to succeed.
- Host spill store filled: If the host memory store has reached a maximum threshold (
spark.rapids.memory.host.spillStorageSize), host buffers will be spilled to disk until the host spill store shrinks back below said configurable threshold.
Tasks local to the producing executor will short-circuit read from the cache.
- Transport: Handles block transfers between executors using various means like: NVLink, PCIe, Infiniband (IB), RDMA over Converged Ethernet (RoCE) or TCP, and as configured in UCX, in these scenarios:
- GPU-to-GPU: Shuffle blocks that were able to fit in GPU memory.
- Host-to-GPU and Disk-to-GPU: Shuffle blocks that spilled to host (or disk) but will be manifested in the GPU in the downstream Spark task.
In order to enable the RapidsShuffleManager, please follow these steps. If you don’t have Mellanox hardware go to step 2:
-
If you have Mellanox NICs and an Infiniband(IB) or RoCE network, please ensure you have the MLNX_OFED driver, and the
nv_peer_memkernel module installed.With
nv_peer_mem, IB/RoCE-based transfers can perform zero-copy transfers directly from GPU memory. -
Install UCX 1.9.0.
-
You will need to configure your spark job with extra settings for UCX (we are looking to simplify these settings in the near future). Choose the version of the shuffle manager that matches your Spark version. Currently we support
- Spark 3.0.0 (com.nvidia.spark.rapids.spark300.RapidsShuffleManager)
- Spark 3.0.1 (com.nvidia.spark.rapids.spark301.RapidsShuffleManager)
- Spark 3.0.2 (com.nvidia.spark.rapids.spark302.RapidsShuffleManager)
- Spark 3.1.0 (com.nvidia.spark.rapids.spark310.RapidsShuffleManager)
...
--conf spark.shuffle.manager=com.nvidia.spark.rapids.spark300.RapidsShuffleManager \
--conf spark.shuffle.service.enabled=false \
--conf spark.rapids.shuffle.transport.enabled=true \
--conf spark.executorEnv.UCX_TLS=cuda_copy,cuda_ipc,rc,tcp \
--conf spark.executorEnv.UCX_ERROR_SIGNALS= \
--conf spark.executorEnv.UCX_MAX_RNDV_RAILS=1 \
--conf spark.executorEnv.UCX_MEMTYPE_CACHE=n \
--conf spark.executorEnv.LD_LIBRARY_PATH=/usr/lib:/usr/lib/ucx \
--conf spark.executor.extraClassPath=${SPARK_CUDF_JAR}:${SPARK_RAPIDS_PLUGIN_JAR}
Please note LD_LIBRARY_PATH should optionally be set if the UCX library is installed in a non-standard location.
UCX Environment Variables
UCX_TLS:cuda_copy, andcuda_ipc: enables handling of CUDA memory in UCX, both for copy-based transport and peer-to-peer communication between GPUs (NVLink/PCIe).rc: enables Infiniband and RoCE based transport in UCX.tcp: allows for TCP communication in cases where UCX deems necessary.
UCX_ERROR_SIGNALS=: Disables UCX signal catching, as it can cause issues with the JVM.UCX_MAX_RNDV_RAILS=1: Set this to1to disable multi-rail transfers in UCX, where UCX splits data to utilize various channels (e.g. two NICs). A value greater than1can cause a performance drop for high-bandwidth transports between GPUs.UCX_MEMTYPE_CACHE=n: Disables a cache in UCX that can cause UCX to fail when running with CUDA buffers.
RapidsShuffleManager Fine Tuning
Here are some settings that could be utilized to fine tune the RapidsShuffleManager:
Bounce Buffers
The following configs control the number of bounce buffers, and the size. Please note that for device buffers, two pools are created (for sending and receiving). Take this into account when sizing your pools.
The GPU buffers should be smaller than the PCI BAR Size for your GPU. Please verify the defaults work in your case.
spark.rapids.shuffle.ucx.bounceBuffers.device.countspark.rapids.shuffle.ucx.bounceBuffers.host.countspark.rapids.shuffle.ucx.bounceBuffers.size
Spillable Store
This setting controls the amount of host memory (RAM) that can be utilized to spill GPU blocks when the GPU is out of memory, before going to disk. Please verify the defaults.
spark.rapids.memory.host.spillStorageSize
GPU Scheduling For Pandas UDF
NOTE
The GPU Scheduling for Pandas UDF is an experimental feature, and may change at any point it time.
GPU Scheduling for Pandas UDF is built on Apache Spark’s Pandas UDF(user defined function), and has two components:
-
Share GPU with JVM: Let the Python process share JVM GPU. The Python process could run on the same GPU with JVM.
-
Increase Speed: Make the data transport faster between JVM process and Python process.
To enable GPU Scheduling for Pandas UDF, you need to configure your spark job with extra settings.
- Make sure GPU exclusive mode is disabled. Note that this will not work if you are using exclusive mode to assign GPUs under spark.
-
Currently the python files are packed into the spark rapids plugin jar.
On Yarn, you need to add
 ...
 --py-files ${SPARK_RAPIDS_PLUGIN_JAR}
On Standalone, you need to add
... --conf spark.executorEnv.PYTHONPATH=rapids-4-spark_2.12-0.3.0.jar \ --py-files ${SPARK_RAPIDS_PLUGIN_JAR} -
Enable GPU Scheduling for Pandas UDF.
 ...
 --conf spark.rapids.python.gpu.enabled=true \
 --conf spark.rapids.python.memory.gpu.pooling.enabled=false \
 --conf spark.rapids.sql.exec.ArrowEvalPythonExec=true \
 --conf spark.rapids.sql.exec.MapInPandasExec=true \
 --conf spark.rapids.sql.exec.FlatMapGroupsInPandasExec=true \
 --conf spark.rapids.sql.exec.AggregateInPandasExec=true \
 --conf spark.rapids.sql.exec.FlatMapCoGroupsInPandasExec=true \
 --conf spark.rapids.sql.exec.WindowInPandasExec=true
Please note the data transfer acceleration only supports scalar UDF and Scalar iterator UDF currently. You could choose the exec you need to enable.
Other Configuration
Following configuration settings are also for GPU Scheduling for Pandas UDF
spark.rapids.python.concurrentPythonWorkers
spark.rapids.python.memory.gpu.allocFraction
spark.rapids.python.memory.gpu.maxAllocFraction
To find details on the above Python configuration settings, please see the RAPIDS Accelerator for Apache Spark Configuration Guide.
Advanced Configuration
See the RAPIDS Accelerator for Apache Spark Configuration Guide for details on all of the configuration settings specific to the RAPIDS Accelerator for Apache Spark.
Monitoring
Since the plugin runs without any API changes, the easiest way to see what is running on the GPU is to look at the “SQL” tab in the Spark web UI. The SQL tab only shows up after you have actually executed a query. Go to the SQL tab in the UI, click on the query you are interested in and it shows a DAG picture with details. You can also scroll down and twisty the “Details” section to see the text representation.
If you want to look at the Spark plan via the code you can use the explain() function call. For example: if query is the resulting DataFrame from the query then query.explain() will print the physical plan from Spark. From the query’s physical plan you can see what nodes were replaced with GPU calls.
The following is an example of a physical plan with operators running on the GPU:

Debugging
For now, the best way to debug is how you would normally do it on Spark. Look at the UI and log files to see what failed. If you got a segmentation fault from the GPU find the hs_err_pid.log file. To make sure your hs_err_pid.log file goes into the YARN application log dir you can add in the config: --conf spark.executor.extraJavaOptions="-XX:ErrorFile=<LOG_DIR>/hs_err_pid_%p.log"
If you want to see why an operation did not run on the GPU you can turn on the configuration: --conf spark.rapids.sql.explain=NOT_ON_GPU. A log message will then be emitted to the driver log as to why a Spark operation is not able to run on the GPU.
Out of GPU Memory
GPU out of memory errors can show up in multiple ways. You can see an error that it out of memory or it can also manifest as crashes. Generally this means your partition size is too big. In that case go back to the Configuration section for the partition size and/or the number of partitions. Possibly reduce the number of concurrent GPU tasks to 1. The Spark UI may give you a hint at the size of the data. Look at either the input data or the shuffle data size for the stage that failed.